The bridge is the true strength of the back. Training program
We usually learn how to do a gymnastic bridge at school. Well, how, we learn - some quickly and easily get into it, either from a lying position, or from a straight stance without any walls, others try to push an unyielding body into the desired position, and still others, the most unlucky and stubborn ones, also get injured in the process.
Just four years ago, gymnastic bridges as a lifting exercise were of interest only to dancers, and even to a narrow group of the population who wanted to bench press more than their own weight. Today, the bridge is promoted by almost every sports publication. Yes, the ability to perform it is an indicator of the flexibility of the spine, shoulder and hip joints, and an indirect indicator of the youth of our body. And if you are afraid, you should still do the bridge, but... This is one of the most traumatic exercises for an amateur, and you should not “push” your own body into the bridge at any cost.
Why is it not given to everyone
The most important thing to understand before doing all the popular exercises is that not everyone can do it. Some people can’t bench press more than 40 kg for years, some can’t do pull-ups, and some can’t stand on the notorious bridge. Which is totally fine unless that someone makes a living teaching yoga and pole dancing. In general, a full gymnastic bridge performed independently is contraindicated until:
- you cannot, in a straight stance, with a straight back and a non-bent thoracic spine, raise your straight arms up and move them back so that the line connecting the palms passes at least 2-3 cm beyond the top of the head;
- you are not able to lift a light stick with a grip slightly wider than your shoulders and move it behind your head;
- you cannot bend your lower back in the opposite direction and pull your pelvis towards your shoulder blades just by lying on your back.
These are mobility restrictions; they are the same for children and adults. Those who want to know how to teach a child to make a bridge should take this into account. If this is the case, you need to do building exercises and return to the bridge only when the restrictions cease to be so. If the matter is complicated by the presence of hernias in the spinal column, as well as arthrosis of the main working joints, it is worth consulting with a doctor about the possibility of bridge training. The same applies to injuries of various origins.
Warm-up and warm-up
In the process of performing a bridge, not only increased joint mobility is required, but also the preparation of muscle tissue and fascia. If you do strength training in your free time from bridges, and/or do serious amounts of cardio, you should start not with stretching in the spirit of school physical education, but with joint warm-up and myofascial release.
The complex could be like this:
- 8 rotations clockwise and counterclockwise with the wrists, then a figure of eight with the hands gathered in a finger lock, then rotation with the elbows clockwise and counterclockwise, arms to the sides, circles with the shoulders back and forth, lifting and lowering the thoracic spine, circles with the pelvis, deep squats without weight to the full amplitude, bending forward with a straight back and maximum flexion at the hip joint, foot circles with a weightless leg;
- Separately, you should perform a set of head rotations and lowering the chin onto the chest;
- Next, you need to take a foam roller or a hard ball and “roll” the calf muscles, the back of the thigh, the back from the sacral to the cervical, the front surface of the body, and separately the triceps, quadriceps, hips and shoulders;
- after this, you can perform about 10-12 minutes of light cardio exercise of any available format to improve blood circulation and increase body temperature.
- half-bridges - that is, the separation of the spine and pelvis in a supine position, the heels are brought to the buttocks, the support is on the shoulder blades, then the exit is on the shoulders, the head lies on the floor, and the heels rest against the floor;
- deflections in the thoracic region - from a lying position, you need to collect your shoulder blades and, as it were, lower them into the back pockets of your trousers (push them towards the lower back), while the pelvis remains on the ground, and the lumbar and thoracic regions are lifted off the ground;
- squats with a light stick behind the head - perform a regular weightlifting jerk (dynamic lifting of a light stick behind the head and a deep squat, literally “buttocks to the floor”) and, stretching the pectoral muscles and lowering the shoulder blades to the pelvis, try to bring the stick behind the head.
All exercises are static, the fixation should be held for 40 to 120 seconds, and 3-4 sets of each should be performed.

So-called exercises for developing spinal flexibility
Strictly speaking, the spine cannot be inflexible. If you have pain in certain areas and are unable to bend yourself into a bridge, the reasons can be very different:
- hernias and protrusions that you don’t know about. Yes, this happens to most adults, some blame it on incorrect posture and weak muscles, some blame it on deadlifts performed off the platform, in general, neither athletes nor those who play sports are immune from this. despises. If there is a stabbing or aching sensation around one or two vertebrae, arms and legs go numb, and there is discomfort when running and walking, you should consult a doctor and not do bridges at home;
- low mobility in the shoulder joints. If your hands do not move behind your back with a straight back, you should develop mobility in the shoulder joints, and not “spine flexibility”; any training should begin with joint warm-up and mobilization of the shoulders;
- weak back extensor muscle. It’s like this for everyone who doesn’t deadlift and doesn’t bend over with a barbell;
- atrophied latissimus and rhomboid muscles and a “round” habitual back posture, that is, “office posture”;
- curvature of the spinal column - the reason here is not the “inflexibility of the structure”, but the uneven development of the muscles of the back and legs, which can significantly affect the biomechanics of movement and complicates the bridge with a raised leg;
- arthritic changes in the joints (unfortunately, there’s nothing much you can do about it, if you stubbornly want to exercise, do more warm-up, and if you follow the classic recommendations, sign up for swimming and massage);
- the banal fear of “breaking your back”;
- changes in the thoracolumbar fascia, they are called “tension nodules” in sports medicine, they appear due to too active strength training. You can knead the nodules with a self-massage roller, or periodically go to a massage therapist.
Complex for shoulder joints
- Rotations
Stand up straight and rotate the heads of your shoulders back towards your shoulder blades, making a very slow movement, literally for 12-15 straight counts. Repeat 9-15 times, then work back. The pace should be such that one set of rotations takes at least one minute.
- Rotations with straight arms
Remember the exercise with a light dough stick? You do the same thing, only without the stick. The goal is to minimally raise the shoulders towards the ears. We begin the rotation with straight arms lowered along the body, bringing them out in front of the body, and bringing them behind the head, and then lowering them along the same trajectory in front of the body.
- Rotations with rope
The same option, but we take a rope or jump rope in our hands with a wide grip, the grip is 20-30 cm wider than the shoulders, the amplitude is comfortable, but the goal is again not to bring the shoulders to the ears.
- Rods of rubber shock absorbers in front of you
We attach the shock absorber to a hook at chest level and pull it towards the face, with the elbows placed behind the back as much as possible. It is enough to do this exercise in 3 sets of 15-20 times at an average pace.
Exercises to correct weak back muscles
If the reason for the lack of a bridge is the weakness of the latissimus and rhomboid muscles, it is necessary to master (these muscles work as stabilizers), pull-ups on the horizontal bar and rows of barbells or dumbbells in an inclined position towards the waist. Exercises should be done in strength mode for 5-6 repetitions, followed by hypertrophy, that is, 8-12 repetitions.
Techniques for making various bridges
- From a sitting position
You need to sit on the floor on your buttocks, feet near the pelvis, start by bending in the lumbar region and placing your hands behind your head, support yourself with your hands and lift your pelvis off the floor. Despite certain aesthetic advantages (can be used in some types of dance, for example), this is biomechanically the most incorrect and dangerous type of bridge. It creates greater compression in the lumbar region, and is safer the faster you can lift your pelvis off the floor. In general, this option is not recommended for beginners.
A variation of this bridge is the bridge while sitting on a gymnastic bench. In this case, you should sit as vertically as possible, straight, so that the pelvic bones are in a plane perpendicular to the floor. After this, the abdominal muscles are relaxed and there is a strong bend in the lower back. Then we lower our shoulders onto the bench, and arch our back upward, supporting ourselves with our shoulders. If this bridge is done for the needs of the bridge, you should actively “bring” the pelvis with your feet to the shoulder blades, after the position of the bridge has been accepted. There is no need to make sudden movements, this is not useful.
Important: do not do bridges on narrow and slippery gymnastics benches. Cover standard gym equipment with a terry towel to ensure stability of the body position and make sure that the shoulder blades do not slip.
- From a lying position
The starting position is the same as for a straight twist, you need to lie on your back and place your feet at a distance of 2 feet from the buttocks. We place our palms behind our heads, support ourselves with our hands and lift our pelvis up, arching our back.
You need to get up from the bridge smoothly, carefully performing the sequence of movements in reverse order. You should not accelerate, much less fall on your back.
Learning to do a handstand from a bridge is even more difficult. To do this, you must, in principle, already be able to stand on your hands. Beginners are advised to stand with their head to the wall in the bridge, and throw one leg at a time onto the wall, while using the help of a belayer.
- From a standing position
Another option, not intended for a beginner in principle. Stand up straight, push your pelvis forward, put your hands behind your head and, pushing your pelvis forward, lower them to the floor. The deflection should be deep, and the position of the palms and feet should be such that it is stable.
Important: you should not train the bridge more than 2 times a week. If you do strength training, it is logical to do it at the end of a bench press workout, since after deadlifts or back exercises, you are unlikely to be able to properly assemble your shoulder blades and make a good arch of the spine.
In yoga, a bridge on the elbows is practiced, this is when the deflection in the thoracic and lumbar region allows you to bend so as to place your forearms, and not your palms, on the floor in the bridge. It is correct to master this bridge after sufficient mobility has been achieved in the so-called fish pose, a backbend in the thoracic region while lying on the back.

Typical beginner mistakes
Beginners usually perform bridges without warming up, trying to learn quickly, and, moreover, without increasing the amplitude in the joints. Stretching is not a light exercise; you need to warm up before it, otherwise the benefits are lost. This is the most important mistake.
In addition, you should not make “springs” throughout the entire range of motion, especially when performing a bridge from a standing position. Ballistic stretching is harmful to joints in principle, and when performed this way it can lead to serious injury. Lead-up exercises should not be neglected. But if the mobility of the joints is normal, but the bridge still doesn’t work, the problem is not with you or the bridge, but with the fact that your feet or palms are positioned incorrectly. Try a wider or narrower stance to increase core stability in the exercise.
And the most important mistake is haste, trying to “do the splits in a month, stand on a bridge in a week,” and in general almost complete the CMS in gymnastics in 2 days. All these girls from the beautiful pictures walked to the bridges with a relaxed expression on their faces for more than one month. Be patient and develop your body holistically and you will definitely achieve your goal.
The article was prepared by Anna Tarskaya (trainer, nutritionist)
The bridge is one of the most effective methods of gymnastics, allowing you to strengthen and stretch the spinal column and spinal muscles in the shortest possible time. This is why the question of how to learn how to make a bridge at home will become the most pressing.
The correct technique and constant implementation will lead to all sorts of positive changes within the body. The bridge exercise provides the following benefits:
- which straighten the spinal column (extensor muscles). Elongated muscle “ropes” that run parallel to the spine on each side.
- A large number of small back, gluteal and limb muscles are trained.
- The flexibility of the spine and general motor activity increases.
- The abdominal muscles are stretched.
- Blood flow improves in the tissues that surround the cartilage between the vertebrae. This creates an obstacle to early wear of the spinal discs.
- The rush of blood to the head increases cerebral blood flow and stimulates mental activity.
In addition, when performed correctly, the gymnastic bridge provides an opportunity to improve flexibility and physical fitness.
Contraindications
The training has limitations. The bridge exercise should not be performed in the following cases:
- . Women receive increased stress on the abdominal muscles, which has serious consequences for the fetus.
- Those who suffer from vascular diseases should not get carried away with the bridge. Excessive stress becomes a provoking factor for stroke or heart attack.
- Difficulties with the gastrointestinal tract, gastritis. During stretching, the gastric walls can tear, causing damage or bleeding of the ulcer.
- Disorders of the thyroid gland. By performing a bridge, it is possible to influence hormones, which leads to a deterioration in the overall health of the thyroid gland.
- Diseases of the ENT organs. An unusual and tense position can cause damage to the capillaries and improperly distribute the load.
- Joint diseases. Bones and joints can be damaged by physical activity, which sometimes leads to injuries and fractures.
- Postoperative period. The exercise provokes suture divergence or bleeding.
But, when there are no significant contraindications, you need to understand that activity will be the key to health. Probably the bridge exercise will be the beginning of a passion for some kind of sport and active physical activity. They master the training step by step, carrying out its simplest variations. In this case, the body will be able to adapt to previously unusual loads.

How to make a bridge correctly, beautifully and plastically
The gymnastic bridge is quite effective thanks to the correct technique and execution. There are a number of common mistakes that should be avoided:
- You should not be afraid of losing your balance when trying to stand on the bridge using your back and shoulders. When performed properly, only the upper limbs are involved.
- Quite often, most people carry out training without transferring body weight to the upper limbs, using the back, without using the shoulder girdle. As a result, the arms are too bent, and the bridge will be unstable.
Proper execution of the bridge exercise is performed by transferring the mass to the upper limbs. The angle between them and the coating is 90 degrees. This can be achieved by pre-warming the shoulders. To do this, you need to swing in a bridge, stretching your shoulder muscles.

Lead-up exercises
Attempts to stand on the bridge without proper physical training can fail and also cause injury. When performing such a stance, appropriate flexibility of the spinal column, strength of certain muscle groups and coordination are required.
Therefore, mastering the stance should take place in stages, regularly conducting special trainings, starting with simple ones and ending with complex ones. Leading exercises for standing on a bridge are included in the training program, and therefore it is possible to master the most difficult variations of such a stance.
Bridge with emphasis on the shoulders (gluteal bridge)
Helps strengthen the muscles of the lower extremities, lumbar region and buttocks. You need to lie on your back, bend your knees and place them wider than your shoulders. The hands are relaxed and placed on the covering. The pelvis is raised to the maximum, a deflection is made in the lumbar region and the buttocks are tensed. At this time, emphasis is placed on the feet and shoulders, the head does not come off the surface. The neck is relaxed, otherwise injury is likely. At the maximum point, you should hold for 2 seconds and lower your pelvis. The number of repetitions and approaches gradually increases. If you manage to do several approaches of 20 times, you should move on to the next stage of training.

Reverse plank
The training in question helps strengthen the muscles of the upper limbs, back, and abs. Performed from a sitting position. The lower limbs are on the surface, straight and spread slightly wider than the shoulders. The palms rest on the floor surface slightly behind the body. The pelvis is raised and the body and lower limbs are aligned in a straight line. The neck does not bend, the head does not drop, the gaze is directed forward. When it is not possible to take such a position, it is possible to slightly bend your legs at the knees at first. You should stay in this position for 5 seconds. You need to perform 3 sets of 15 times.
Exit to the bridge from the bench
To carry out such a variation of the training in question, you will need a bench, a small box or other stable support. You should sit on a bench, place your palms on the edge on each side of you. Move your lower limbs in front of you and lower your shoulders onto the bench. Rearrange the hands so that the palms are fully positioned on the bench, the fingers are directed to the lower limbs. At the same time, the feet are on the surface and the knees are bent at an angle of 90 degrees.
Half bridge
Take a fitball or a small pouf. It is possible to use any low object. You should sit on the surface and place the ball behind you. Next they lie on it with the center of the back. The lower limbs are placed on the floor surface and bent at the knees. Hands are placed on the covering near the head, fingers to the feet. The neck relaxes and the head drops down. From this position, the upper and lower limbs extend and the back bends to the maximum. It is enough to do 2 sets of 20 times.

Classic bridge
Having mastered the bridge from a support, it is possible to move on to practicing the stand from a lying position. Starting position: lie on your back, place your feet at your buttocks wider than your shoulders, place your palms on each side of your head, and point your fingers toward your shoulders.
Using the upper and lower extremities, the body is pushed upward and, having arched the back, you should try to straighten your arms and legs. Then, when you managed to get into the bridge, you need to stay in this position, and then return to the starting position.
Competent implementation of the training meets the following conditions:
- The deflection in the back should occur to the maximum, the body takes an arched shape.
- The limbs are straight, the palms are located under the head.
- The pelvis rises to the maximum and is above the level of the head and shoulders.
- The lower limbs need to be straightened; it is permissible to bend a little at the knees.
The stance is practiced until you can complete 15 repetitions in each of 2 approaches.
Descent and ascent along the wall
The algorithm for carrying out the exercise is as follows:
- You should stand with your back to the wall at a distance of 2 steps. Bend back and rest your palms on it. Fingers point downwards.
- Take small steps with your hands along the wall and lower yourself to the surface. It is possible to retreat slightly with your lower limbs so that the distance to the wall is comfortable. You should stay in the bridge for 5 seconds.
- Then you need to climb back onto the wall with your hands. This is more difficult than going down and will require more effort. Each movement is performed in reverse order. At the maximum point, you need to return to the starting position - standing with your back to the wall.
- You should step back and forth 8 times, do 2 approaches.
Such training improves the flexibility of the spine and eliminates a large number of problems.
Bridge from a standing position
Even more effective is the ability to stand on a bridge from a standing position. It will take more time to learn how to perform the exercise from this position, but the effort will be rewarded. You should stand up straight, place your lower limbs shoulder-width apart, and place your hands on your belt. Then:
- At the wall bars, you should bend your back in the opposite direction, grab the bars with your hands and, doing the sorting, go down. In the same way, you should return to the starting position. Shoes and flooring should not slip, otherwise there is a risk of falling and injury.
- It's easier to do this with the help of an outsider. You must ask someone close to you to hold your waist with 2 hands while you perform the exercise. He will then hold the back with 1 hand, and at a certain point he will remove it too.
- A deflection is made in the lumbar region (without a wall bars or support from the side), the knees are bent, the body is directed forward.
- The arms are straightened and bent back to touch the surface.
- It is even more difficult to get up from the bridge onto your lower limbs: you need to move your torso in front of you and bend your knees. Push off the surface a little with your hands and straighten up. The first ones go directly to the arms, not the shoulders - this is a common mistake for beginners.
It is possible to ask the person to provide support by holding your back with your hands. After a certain time, support will no longer be required. The standing bridge requires appropriate flexibility and coordination.
To make a bridge from a standing position, you also take a regular gymnastic mat. This is quite reliable, since the training has not been fully worked out. They bend back, fixing the position for 2 seconds, and then fully lower themselves onto the bridge. They push off with their hands and return to the starting position.

Raising to a standing position
Standing up from a bridge onto your lower limbs is perhaps the most difficult exercise. However, as a result of hard training, development of the muscles and vestibular apparatus, after several exercises, it is possible to do this.
While in the bridge, you need to try to transfer the weight to the lower limbs; for this purpose, you need to bend your knees and push your pelvis forward. It is possible to “come” a little with your hands to your feet. Afterwards, push off with your hands from the covering and at the same time shift the center of gravity, straighten up. For these purposes, some effort will be required.
At the initial stage of mastering the bridge, it is advisable to ask for support. The neighbor supports the waist area with his hands during the exercise. Having understood which muscle groups are involved during the exercise, you will soon be able to learn how to do the bridge while standing yourself.
Having mastered the technique of performing a bridge and lifting from it, such training is practiced until it becomes automatic and remains in the training program. Consistent exercise provides significant health benefits. However, when such training is not performed regularly, the skills developed may be lost.
How to teach a child to make a bridge
Before a child learns to do a bridge from a standing position, he needs to warm up so that the muscles are warmed up and do not get injured during the exercise. Later you will be able to perform a gymnastic bridge virtually without preparation. This is precisely why children are required to warm up their muscles before classes. The following exercises will help with this:
- You need to lie on your stomach, stretch your arms in front of you. The upper and lower limbs rise, you need to bend as much as possible. The knees are straightened, a similar position is fixed for 30 seconds.
- You need to lie on your back on a hard surface, place your arms along your body, and bend your lower limbs. Raise the pelvis for a maximum of 10 seconds, then carefully and slowly lower it.
- You should kneel down and spread your lower limbs across the width of your pelvis. Then they slowly bend back to reach their heels with their toes. It is extremely important to arch your back and throw your head back.
- To perform this training, you will need a ball. Fitball is intended for physical training. You should lie on your back on the ball, and place your lower limbs in a stable position. Then they bend over and try to reach the covering with their palms.
By carrying out such trainings every day, the child will quickly be able to stand on the bridge, as well as cope with various problems associated with the spinal column.
When the previous trainings have been fully mastered, it is permissible to begin performing the bridge from a standing position:
- The child needs to stand with his back to the wall - as a result, a distance arises that is equal to 80 cm. The lower limbs are placed shoulder-width apart, the arms are raised up. They carefully begin to bend backwards until their fingers can touch the wall. Next, you should move them along the surface, slowly going down. When your hands have reached the covering, you need to stay in this position for 5 seconds, then resume “climbing.”
- When the first training is fully worked out, the child may not use the wall and begin to perform the bridge on a soft surface. Initially, help from neighbors and parents is possible to provide backup in the event of improper implementation or problems arising.
- The upper limbs rise and slowly lower in the opposite direction. After the exercise, you need to stay in this position, then push off from the surface and take the initial position.
Parents who do not know how to teach their child to perform a gymnastic bridge can use these recommendations and together achieve positive results, even at home.
Before you begin the practical part of the exercises, you should read the recommendations. Initially, you should objectively evaluate your own initial data: mass, plasticity, physical fitness. When you weigh more than 80 kg, when your back is not very flexible and you have not previously performed gymnastic exercises, you should not hope to be able to stand on the bridge in a few days. It takes effort, it will take at least a month or more.
You need to check the flexibility of your own spine. For these purposes, fix a mark on the wall at shoulder level:
- They stand with their backs to her. They take a step away from the wall. The back is bent in the opposite direction. If you can see the mark, you have sufficient flexibility and it will not be difficult to get on the bridge in a few days with the proper intensity of training.
- Turn to the left side, raise your straight right hand upward, you need to touch the mark. The exercise is repeated for the second side.
Flexibility exercises are selected. Training programs are different, taking into account physical fitness and mood:
- every day for a quarter of an hour;
- every other day for half an hour;
- 2 times a day for a quarter of an hour.
The bridge gives positive results in stretching the spinal column only when the training is carried out properly. It is good gymnastics and a great way to warm up your muscles. When performing a gymnastic bridge, it is possible to eliminate pain in the back, cervical region, and spinal column when there are no medical restrictions.
2 ratings, average: 5,00 out of 5)If you cannot bend forward and reach the ground with your hands, or bend back when you see a wall, then you should definitely do special exercises that increase the flexibility of the spinal column. Otherwise, you may soon begin to feel back pain. In this regard, you should find out how to stand on the bridge. This gymnastic exercise will allow you to significantly improve the flexibility of the spinal column.
To find out the degree of flexibility of the spine, you should fix a mark on the wall (door), placing it at the level of the shoulder joints. After this, you need to perform two movements:
- Take a standing position with your back to the established mark at a distance of one step. After this, start bending back and try to see the mark.
- Turn to the mark with your left side and, raising your straightened left hand, try to touch its mark. Perform in the other direction.
If you can easily cope with these tests, then your flexibility is at a high level. If you have difficulty doing this, then your flexibility is average, and when you cannot perform the movements, it is poor.
Warm-up exercises in preparation for the bridge
Below we will tell you how to stand on the bridge, but before that you need to do a good warm-up to prepare your body.
Exercises for the shoulder girdle
- Perform rotational movements with straightened arms back and forth.
- Bend one arm at the elbow joint at chest level, placing your forearm parallel to the ground. If you bend your right arm, then begin to turn your body to the right, while twisting the spinal column. After this, repeat in the other direction, changing hands.
- Bend your arm at the elbow and lift it up, placing your forearm behind your head. Start pulling the raised hand down with your second hand, and after completing it, repeat the exercise in the other direction.
- Lower your straight arms down and join them in a “lock.” Then lift them up, simultaneously bending your back and shoulder girdle.
Exercises for the lower back and shoulder girdle
- The palms are on the hips. Begin to bend back, throwing your head back.
- Leaning your upper body forward, simultaneously extend your closed, straight arms parallel to the ground.
- Close your hands and begin to tilt your body forward until it is parallel to the ground. Swing your straightened arms above the back of your head, tilting your torso forward and touching your hands to the ground.
- The palms are on the back of a stable chair or the crossbar at waist level, and the legs are straightened. Keep your spinal column as low as possible.
Exercises for back muscles
- Your legs and backs should be straightened and in this position, begin to perform circular movements with your upper body.
- The legs are straightened and located at the level of the shoulder joints. Bend to the sides and at the same time straighten your arm, located at the top parallel to the ground.
- Take a position on all fours and begin to arch your back up and down with the greatest possible amplitude, imitating the movements of a cat.
- Without changing the starting position, imagine that there is a crossbar in front of you, not far from the ground. Perform the movement as if you were crawling under this bar.
- Take a lying position on your stomach, clasping your palms at the back of your head and arching your upper body at the lower back with maximum amplitude.
- Without changing the starting position, extend your arms forward, clasping your palms. Roll from your hips to your chest and back.
- The starting position is similar to the previous movement, but the palms rest on the ground. Begin to arch your lower back, throwing your head back.
- Stand on your knees and begin to swing your legs while bending your lower back.
The most common mistakes when performing a bridge

Now we will talk about the most common mistakes made by beginners, and then you will learn how to make a bridge from various positions. When the shoulder girdle does not have sufficient flexibility, the main support when performing a bridge falls on the legs. This is a very unstable position, since the body weight is distributed unevenly. Also in this case, the feet and palms are located quite far from each other and this increases the load on the muscles of the limbs.
When the bridge is performed correctly, the limbs should be perpendicular to the back. To increase the mobility of the spinal column, when performing a bridge, you need to straighten your legs and arch your back. You can also rock slightly alternately in the direction of your palms and feet. As the mobility of the spinal column increases, you should gradually reduce the distance between your feet and palms.
How to properly stand on the bridge in a prone position?

Take a lying position on your back and place your heels in the buttocks area, bending your legs at the knee joints. The palms are placed on the ground slightly above the shoulder joints, and the fingers are directed towards the body.
Tightening your leg muscles, begin to lift your pelvis. After this, you need to bend your back, straightening your legs at the same time as far as possible. Returning to the starting position, the shoulder blade should first touch the ground, and then the buttocks. Perform the movement several times.
How to properly stand on the bridge in a sitting position?

The legs must be bent at the knee joints, the back must be straightened, and the feet must be on the ground. Place the palm of your right hand on the ground and twist your body slightly. Begin to lift your buttocks off the ground, leaning on your legs and right arm. After this, describing an arc with your left hand, place your palm on the ground and stand on the bridge.
Returning to the starting position, all movements should be performed in the opposite order. As the flexibility of the spinal column improves, it will be useful to master the rollover from the bridge position:
- The upper part of the body must begin to turn to the left, moving the right hand behind the left. After this, you need to place your left leg behind your right. As a result, you will find yourself in a position where your back is pointing up and you are resting on your palms and feet.
- To return to the bridge position, you must simultaneously place your right leg and arm.
How to properly stand on the bridge in a standing position?

If you have mastered the technique of performing a bridge in a lying and sitting position, then you can learn how to stand on a bridge in a standing position. This is the most difficult exercise and requires good preparation. At first you can train at the wall bars or just near the wall.
Stand about 80 centimeters from the wall, placing your feet at the level of your shoulder joints. After this, begin to bend back until your fingers touch the wall. Continue bending over while moving your fingers along the wall. As a result, you must stand on the bridge. Work against the wall until you master the technique of performing a bridge in a standing position.
After this, you need to stop using the wall and for this you should use a mat. It will also be very good if you are insured. You need to face the person insuring you, placing your legs at the level of your shoulder joints. Start raising your hands, and at this moment your friend can already begin to back you up, holding you under your back.
When leaning back, it is necessary to pause for a second at the end point of the trajectory and, avoiding sudden movements, stand on the bridge. To return to the starting position, you should push off the ground with your hands and straighten up. Don't give up on the belay until you have fully mastered this technique.
Very often, when performing a bridge in a standing position, the same mistake is made - the movement is performed with the back and shoulder joints. You only need to move your arms to make a bridge. Also, often the bridge is performed only due to the movement of the back and the shoulder girdle is not involved in the work at all. As a result, you will not be able to fully straighten your arms and this will significantly reduce your stability.
How to properly warm up and do a bridge, you will learn from this story:

The beauty of the body, ideal shape, is not only strength and endurance. Plasticity plays an important role in creating your own figure. One of the truly revealing exercises that demonstrates good stretching and flexibility is the bridge. This is a kind of plastic test, which not even every athlete who regularly works out in the gym can pass from the start.
Few people imagine how to stand on a bridge, what exercises need to be performed in order to develop the necessary plasticity and harmoniously develop their body. Even if the task seems impossible to you for now, after simple hard training, doing a stand is quite possible for everyone. This way you can significantly develop the flexibility of the spine and the quality of the muscle corset that supports it.
Advantages and contraindications of the bridge exercise: why you need to do it
By actively taking care of your body and pumping up your muscles, you can make your appearance attractive, fit and sexy. However, ease of movement and that unique plasticity that is called “the grace of a cat” cannot be achieved this way. When the muscles are “wooden” and the joints and ligaments are not particularly flexible, movements become cumbersome and the person becomes clumsy. Having figured out how to learn how to do a bridge, you can achieve that unique dynamism of your figure, lightness and grace, and at the same time acquire correct posture, which will only benefit your health.
Before you start training to stand on a bridge, it doesn’t hurt to check your spine for flexibility. For this you don't need anything other than a wall. Attach a mark to it, approximately at the level of your shoulders. Turn your back to the wall and take one or two steps back. Lean back and throw your head back as far as possible without holding on to anything. If you were able to see the installed mark, then everything is in order with the spine and muscle corset. If it is not in your field of vision, you will have to work hard before you can do this exercise easily and naturally.
There is also an additional test for spinal flexibility. To do this, you will have to stand sideways to the wall, with a mark placed on it. Raise your arm above your head and straighten it. Then, by tilting, without lowering the limb, try to touch the designated place with your fingers. Repeat the same with the other hand. If everything works out well, then there are no problems with flexibility, you can immediately move on to the bridge. If you didn’t succeed in doing everything as it should, you will have to work on this moment more intensively.
Benefits of bridge exercise


This exercise is not limited to a positive effect on a person’s appearance, posture and figure. For example, eastern sages and healers believed that it was the main “core” of life, the basis of health and longevity. At the same time, Indian yoga is also permeated through and through with just such stances and asanas that train the flexibility and mobility of the spine.
- Deflections strengthen the muscular corset of the back, which supports all internal organs.
- Flexibility and mobility increases, which greatly simplifies the task of feeding bone and interosseous tissues with oxygen and nutrients. They get all this not from the blood, but from a special synovial fluid. Moreover, its influx is ensured precisely by the movements of the vertebrae. That is why in people with, degenerative diseases of cartilage tissue can appear at a fairly early age.
- During bending and bending, the spinal discs are constantly compressed and then unclenched. This creates the effect of a kind of internal massage. As a result, synovial fluid flows to them, nourishing and rejuvenating.
- Strength training without a strong back completely loses its appeal. After all, they can be extremely traumatic. Please note that the training of strength athletes necessarily includes bridges and other stretching and flexibility exercises.
- In addition to the spine, new potential opens up in terms of expansion of the chest. This helps to increase the elasticity of the abdominal muscles, and at the same time increase the volume of the lungs.
In addition, one should not lose sight of the effectiveness of this seemingly simple exercise. Standing on the bridge in the hall, you can easily attract the admiring glances of everyone around you. For many, this is also an additional motivation.
Contraindications for performing a bridge
- Increased blood or intracranial pressure.
- Spinal diseases.
- Recent back and lumbar injuries.
- Feeling unwell, headache, increased body temperature, fever.
- Exacerbation of chronic diseases.
- Radiculitis.
- Pregnancy.
We study technique: how to make a bridge correctly


When you have already completely understood the benefits and harms, but still don’t know where to start, you should pay attention to proper preparation. Without this, you can get a serious injury, the consequences of which will then have to be treated for a very long time. You will need to develop maximum coordination of movements, strength of certain muscle groups, as well as flexibility of the spine, which we have already mentioned several times. You need to master the stance very slowly, moving from stage to stage, without making sudden sudden jerks. Moreover, it is enough to include additional exercises in the usual complex of your training program to achieve results quickly and “painlessly”.
Preparatory exercises for developing back muscle flexibility
Warm-up
As before any training, you must first properly warm up your muscles so as not to get injured during exercise. A few stretching exercises, jogging or jumping won't hurt. Walking and jogging in place can also be good options for warming up. For convenience, you can pick up a jump rope, do several bends, circular movements of the body, and light lunges. It won’t hurt to do a warm-up for your hands and make circular movements with your shoulders.
Gluteal bridge
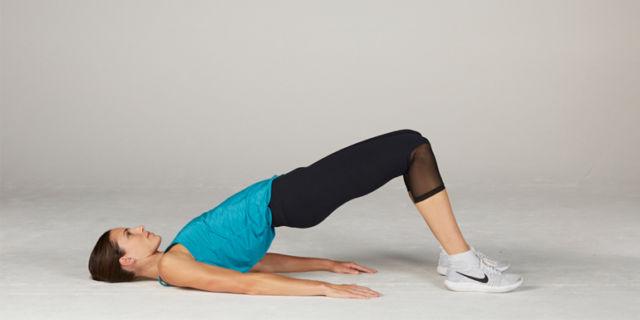
This exercise, with such a characteristic name that characterizes it well, has many different variations. - this is raising the pelvis while focusing on the feet and shoulder girdle standing flat on the surface. There is a lot of material about it on our website; it wouldn’t hurt to read it in more detail in order to fully understand how, what and when to do.
- From a supine position, bend your knees and place them on the floor. Stretch your arms along your body.
- As you inhale, lift your pelvis and back until they are in a straight line. Support should be maintained only on the shoulders and feet.
- Hold the position for a few seconds.
- Slowly lower yourself to the starting position.
You can diversify the exercise by varying the distance between your feet, performing it alternately on one leg and the other, picking up a barbell or using a fitball. In the classic version, they should be placed at shoulder width, but they can be narrower or wider. This way the force will be transferred to different muscle groups.
The number of repetitions of the gluteal bridge is purely individual. For a beginner, you don’t need more than two or three dozen repetitions in two sets. Then this number can be increased arbitrarily.


This exercise develops flexibility as well as coordination of movements. It may be difficult for beginners to complete, so do not rush too much.
- Roll over onto your stomach, lie straight, put your head on one side and your arms above your head.
- As you inhale, raise your arms and shoulders, at the same time as your upper body. At the same time, you also need to raise your legs. You will have to try not to bend both pairs of limbs, as in the picture.
- As you exhale, return to the original position.
For convenience, your palms can be folded into the shape of a boat nose, and your legs should be pressed tightly against each other. You will also have to pay attention to your hips; they should be as tense as possible, and not “fall apart” to the sides like jelly. You can repeat this 10-16 times for beginners, and over time, double this number.

Another very effective exercise for developing the back muscles, as well as its flexibility, is this. There is also an article about this on the site, which would not hurt to read. It strengthens the back, makes it more mobile, and at the same time has a beneficial effect on the whole body, helps to lose weight, and improve posture.
- Sit on a horizontal surface (floor), spreading a gymnastic mat in front of it. Bring your legs together, they should be straight. Place your hands on the floor behind your back so that your hands are in line.
- As you inhale, lift your hips, tensing all your muscles until your body is in one line. Avoid bends or bulges; it should be completely in one straight line. Hold the position for a few seconds.
- As you exhale, return to the starting position.
For beginners, when lowering the pelvis to the floor, you can relax, but advanced athletes do not need to take a break and immediately after returning to the original position, they can repeat the exercise. The quantity is also purely individual, but it’s good to start from two dozen times in two approaches.
How to do a standing bridge for beginners: with support


Before you try to stand on the bridge, you can use additional support. A good option would be a large fitness ball. You can also read it on our website.
- Sit on the floor with your back to the ball.
- Leaning on your palms and feet, slowly “roll” the middle of your back onto the fitball.
- Raise your hands above your head, place them under the ball, and then place your palms on the floor, pointing your fingers toward you.
- In this case, you need to relax your neck as much as possible and tilt your head back. It can be conveniently placed on the rounded surface of the ball.
- Slowly lift yourself up from the support while bending your body. Make springy movements. At the point of maximum possible straightening of your legs and arms, try to fixate for a few seconds.
Only when this exercise is easy will you be able to move on to performing a real bridge without support. Moreover, there is not one, but several types of such movement; try to master them all, gradually moving from simpler options to more complex ones.
How to perform a bridge while lying down


When the exercise with the ball is no longer difficult, you can move on to exercises without improvised means. The easiest way is to get into a standing position from a lying position on your back, which is where you should start. It is optimal to conduct classes on a fairly soft mat, and not on a thin yoga mat. If you are not working out in the gym, but at home, you can simply throw a not very soft mattress topper on the floor, which is often used to level the “dip” between mattresses on a double bed.
Execution technique
- Lie on your back with your knees bent and your feet flat on the surface. The heels should be as close to the buttocks as possible, or even better, even slightly under them.
- Place your hands behind your head and place your palms so that your fingers touch your shoulders.
- Tighten your abdominals and leg muscles, and then lift your pelvis. While resting on your feet and palms, bend well in your lower back and back.
- Returning to the starting position should be done from the shoulder blades to the buttocks, and not vice versa.
Be very careful as it is very easy to get injured on the bridge. Make all movements smoothly, without jerking. Don’t try to force things, try to do everything consistently and gradually.
How to properly stand on a bridge from a sitting position


Only when you can easily get up into this stance from a lying position can you move on to a more advanced option.
Execution technique
- Sit down on the floor. Bend your legs at the knees, bringing your heels as close to your buttocks as possible. Place your right hand behind your shoulder and position it as when performing a bridge from a lying position, place your left hand along the body.
- Using your right arm and feet, push your pelvis upward, as if doing a glute bridge.
- Describe a semicircle with your left hand, bringing it to the same position as your right.
- Place your hands on the floor and arch your back, making a full bridge.
Returning to the original position will not be easy. The easiest way to do this is to turn to one side. At first, you can simply fall gently onto the mat, but this is a temporary option; this technique is not welcomed by any of the professional trainers.
Technique for performing a bridge from a standing position

If the technique of performing a bridge from a lying and sitting position completely satisfies you, you can move on to the most difficult thing - doing a stand from a standing position. This is not easy, since you will have to find balance with only one point of support, and it is very easy to lose balance. There are two options that we will present to you, the first is simpler and the second is much more complex. It makes sense to first learn how to make a bridge while standing at the wall bars and only then not use any additional means.
Near the Swedish wall
The starting position is simple. Stand with your back to, taking one big step away from it.
- Straighten your arms up.
- Tilt them back while arching your back.
- Grasp the bar that is easiest to reach with your fingers.
- Carefully, slowly, move your hands to the step below, then even lower.
- After the lower plank, simply move your palms alternately to the floor and bend your back well, becoming a bridge.
It is optimal to return to the original position in exactly the opposite (reverse) order. That is, gradually move your hands up the stairs until you stand up. First, be sure to place soft mats under you during exercise, otherwise it’s easy to get injured, which is absolutely unnecessary for anyone.
Just standing
- Stand straight, feet should be shoulder-width apart, arms raised up.
- Bend your knees while simultaneously starting to bend your lower back.
- Bend deeper, trying to control this process with the abdominal muscles, as well as the muscular corset of the back.
- Reach out and touch your fingers to the surface of the floor. Fix your hands by pressing them tightly to the surface.
- To ensure the correct position, you can take a couple of small steps towards your hands, as if increasing the arch of your back.
How to properly stand up from a bridge


Remember that getting up from the bridge according to all the rules is much more difficult than getting down into it. The stand is quite complex, so it makes sense to experiment. It is unlikely that you will be able to do everything correctly in the reverse order if the strength of the muscles of the back corset and spine, as well as strength and flexibility, are insufficient. Therefore, it is very important to do all the preparatory exercises constantly. They should be included in daily exercises, for example, morning exercises, then you will achieve the desired effect faster.
Option 1
- To lift their stance, shift your weight forward onto your legs, and also move your pelvic area there.
- Push your palms firmly off the floor, carefully maintaining your balance and moving your center of gravity to the usual position for a vertical stand.
- Stand up straight.
It is optimal that at first you have someone to help you get up from the bridge. This could be a colleague at the gym, or even someone from the family if you work out at home. Over time, the need for insurance will disappear on its own if you continue to train.
Option 2
There is a more simplified option. This is something in between a wall bars climb and a classic climb without a safety net. At first, you can use this way out of the situation.
- Pressing firmly into the floor, lean your whole body forward.
- Push off slightly from the floor and first raise your left arm. At the same time, rotate the body slightly to the left.
- Immediately push off with your right hand, and then stand up using a twisting movement in the back.
If you train a lot, and most importantly, regularly, then such a stance will be easy for you.
Common mistakes and safety

It wouldn’t hurt to consider a few more questions that will help you cope with the exercise much easier.
Common Mistakes
- Incorrect neck and head posture can lead to unexpected results. You cannot strain your neck, it should be as relaxed as possible, otherwise you will not get the desired effect from the exercise. Raising your head up is also not the best option; the chin should be lowered, the eyes should look straight ahead.
- Do not “let go” of the abdominal muscles in the bridge. You must control every movement, otherwise injuries cannot be avoided.
- Do not try to immediately perform a bridge from a standing position without preparation. Even if you think your stretching and flexibility are up to par, still warm up and learn how to do preparatory movements. Only after this proceed directly to the bridge.
- Shift some of your weight during the stance to your arms and shoulders. Otherwise they will be too straight or, on the contrary, curved. The stand will turn out ugly and incorrect.
Security
- As we have already said, safety should be your priority in everything. Therefore, beginners definitely need to lay soft mats or a mattress topper on the floor.
- When exercising in the gym, you can ask the trainer to monitor the process. Colleagues at the gym can also help. At home, involve your family and friends in the process.
- As soon as you begin to feel unnatural stretching of muscles, ligaments or incorrect position of joints, stop the exercise immediately.
- There is no need to be afraid of losing your balance, transferring your weight first to your lower body and arms; the vestibular apparatus itself will put you in the desired position.
To find the correct safe position in the bridge stance, as well as to make it beautiful and graceful, you need to sway slightly back and forth to find the optimal stable position.
Hello, friends. How to stand on a bridge from a standing position is not an idle question. There are many nuances in the rules for performing this seemingly simple exercise.
We will deal with them today. And at the same time we’ll find out why this element is so important for our health.
Important, necessary and useful
You noticed? — in our gyms no one does bridges. Train or, pump up your abs or – that’s always welcome. But this gymnastic element is not.
Meanwhile, the bridge is not only and not so much entertainment from childhood, but a completely serious exercise that
- increased blood flow to the cartilage tissue located between the vertebrae
- works the deep back muscles
- expands the chest
- Helps restore spine flexibility
And thanks to this, as a result:
- salt deposits are reduced
- eliminates the possibility of vertebral displacement
- lung volume increases
- improves joint function and coordination
When performing an element, literally all the muscles of the body are involved: arms and legs, shoulders and neck, abdominal and chest muscles, knees and hips work.
In general, the element perfectly strengthens the musculoskeletal corset, which protects the spinal cord - the second most important organ in our body after the brain.
A weak spine means a high risk of injury and displacement of the vertebrae, resulting in a bunch of diseases.
Thanks to the bridge, we stretch very well, and stretching helps to lose weight.
Do you see how much benefit there is? So, hurry to the bridge!
The quieter you go, the further you'll get
However, there is no need to rush in this matter, friends. If you are an untrained person, do not be friendly with the flexibility of the spine - instead of benefit, there will only be harm. Initially, you need to properly prepare for the element.

And first, let's study
Four rules of the bridge
- Smooth, deep breathing
The smoother you breathe, the more accurate your technique.
- Straight body, maximally arched back
The muscles are weakened, the emphasis is on the limbs.
- The pelvis is much higher than the head
If the buttocks are located below the pelvis, or even almost touch the floor, the position is incorrect.
- Straight arms and legs
If possible, the limbs should be as straight as possible.
Preparation
This stage consists of one or two stages. You can skip the strength exercises described below, but it’s better not to do so.
Strength exercises
If you have never done this element before, experts recommend first training at least your knees, hips, waist and arms.
Do squats, hanging leg raises, push-ups, and abdominal exercises.
And only when you perform these simple exercises without shortness of breath, calmly and confidently, move on.

Warm-up
Second phase. Beginners cannot do without it under any circumstances.
Warm-up includes exercises for the shoulder girdle, back, and lumbar region. Including:
- Rotations with straight arms in different directions.
- Tilts the torso while simultaneously stretching the raised arm towards the tilt.
- Back bend with arms raised up in a lock - the body leans forward, arms back.
- Circular rotations of the body. The back is straight.
- Exercise “cat” - standing on all fours, arch your back with maximum amplitude up and down.
- “Crawl under the crossbar” - the crossbar is virtual. Imagine her standing on all fours. You arch your back as if you are trying to crawl under this obstacle.
- “Basket” - lying on your back, grab your legs with your hands and, as if “growing”, lift your legs up with your hands.
- Swing your legs. Standing on your knees, alternately wave your legs, bending your lower back.

We stand on the bridge
Well, now it’s finally the turn to start training your back.
And, before you do it from a standing position, you should learn how to climb it
From a lying position
The technique is simple:
- Lie on the floor (mat).
- Knees bent at the knees, heels next to the buttocks.
- Palms at the very shoulders.
- Leaning on our hands, we bend our back and try to stand up.
On fitball
Let's call this stage “intermediate”. It helps to better train your back flexibility.
Lie on your back on the fitball. Feet at shoulder level, pull your arms forward and down, trying to reach the floor.
“Intermediate” stages also include climbing onto the bridge from your knees or from a large pillow. The rules for their implementation are approximately the same as in the case of a fitball.
From a standing position
And here it is, the moment when we came close to our cherished goal.
There are several ways to do this gymnastic element from a standing position.

Back to the wall
Stand about 80 cm from the wall, feet shoulder-width apart.
Raise your arms up and start leaning towards the wall.
Resting against the wall, slowly go down it with your hands.
Having lowered yourself to the floor, freeze in this position for a few seconds, then rise up.
Rely only on yourself
Well, and also for someone who agrees to insure you for the first time.
This is done without relying on the wall. At first, you can sit down on the bed rather than on the floor.
The technique is the same as in the case of the wall.
At the same time, remember the main rule - you should go to the bridge with your hands. Not your back and shoulders. Stretch your arms forward, lowering your torso down.

When you reach the floor, freeze for a few seconds, then rise up.
Tip: the closer your feet are to your hands, the better - this way your bridge is as stable as possible.
Repeat several times.
Option for warming up and getting up from a standing position
By training a couple of times a week, you will soon be able to easily stand on it without outside help and extra effort.
What to remember
- The bridge is a great opportunity to train your back muscles, become stronger, more flexible, make your joints more functional and remove salt deposits. It's also a great stretch to help you lose weight.
- Get ready if you haven't exercised in a while. Warm up thoroughly before doing it. Let a trainer, massage therapist or your friend back you up.
- At the same time, remember that if you have problems with the joints, spine, as well as other contraindications such as blood pressure, heart disease, stomach disease, you should never engage in such training on your own. In all these cases, consultation with a doctor is necessary.
Do you like this element, friends? Do you know how to do it? Are the tips collected here helpful? Share in the comments! And with this I say goodbye to you. See you again in new blog articles!