Roller for the press: necessary information, reviews, efficiency. Gymnastic wheel with handles - a simulator for the press and not only Features of the exercises
A press roller is a sports equipment that has a fairly simple design. It is a handle divided into left and right sides by a wheel, which is located in the middle, thanks to which it is as comfortable and convenient to hold it with both hands as possible. The simplicity of the device does not mean that it has low efficiency.
Exercises performed with a roller pump well the muscles of the abdomen, back and triceps. This is true only when the execution technique is observed. Roller training is highly effective, and for most exercises you need to be a fairly experienced athlete.

Sports equipment must be such that it supports the body well and allows you to move back and forth without jerks. The gymnastic hard roller has a device that allows you to exercise on a tile or rug without making intermittent movements. The device, which has a double wheel, has a wide base and distributes the mass as evenly as possible.
It is recommended to choose a wheel in such a way that it maintains its stability under the weight of the athlete during the rental. For beginners, it’s easiest to work with rollers that have two parallel wheels or one, but rather wide. To achieve good stability, it is necessary to choose a rubberized wheel. It is absolutely stable on any surface. The device must have ergonomic foam handles.
This material allows you to firmly hold the wheel and maintain good balance. There are designs equipped not only with handles, but also with pedals. Such options for rollers help diversify the set of exercises performed using this sports equipment. The handles must fit snugly against the palms, and the pedals help to hold the feet without any slippage.

Exercises with a roller for the press, requires good preparation. Without well-developed muscle mass, it is impossible to provide proper support for body weight when rolling. The application of the roller causes the body to move, and the spine is stretched during the entire movement. This poses a challenge for the deep-lying spinal stabilizers and the rectus and transverse abdominal muscles.
Such an impact makes the roller an ideal device for pumping relief and strong abdominal muscles. The movement also engages the accessory hips, shoulder, latissimus dorsi, and triceps. They are responsible for stabilizing the body from the shoulder girdle to the very toes, which allows you to maintain balance when the wheel rolls under the torso.
9 Ab Roller Exercises
You should work with the device from a simple bar, but relying on a roller wheel, and only then move on to more complex ones, that is, when you are completely sure that you can move on to exercises that involve your knees, and only then to a full rental and other more complex variations. An absolute beginner can first work with a fitball.

The wheel plank strengthens the stabilizing muscles and also helps you get a feel for how to properly hold the roller and balance.
Technique:
- before the gymnastic roller get on all fours;
- grab the handle with both hands, pointing the palms down;
- the torso is raised to the plank position, and then straightened in one line from the head to the very heels;
- the body is kept in constant tension and the accepted position is held for 30-60 seconds.
Do three to four repetitions.
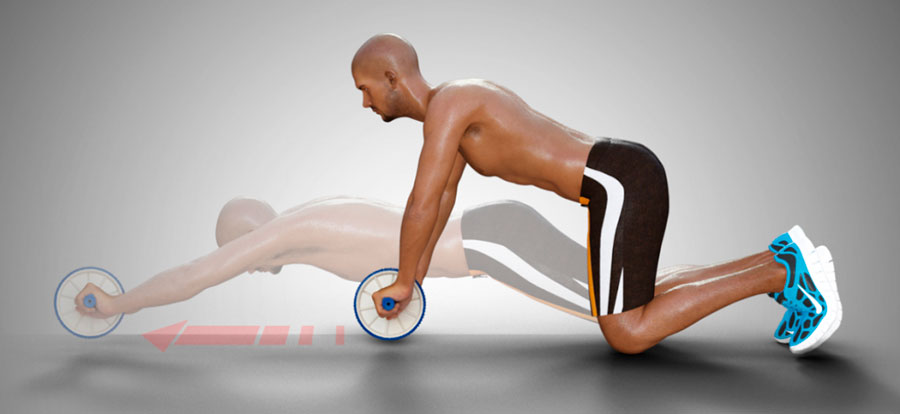
This is the next most difficult exercise, which allows you to move to a new level of complexity. At first, rolling from your knees is best done with a folded towel or flat pillow.
Performance:
- kneel down, take hold of the handles and stretch out their arms;
- to avoid arching the lower back, tighten the abdominal muscles;
- roll slowly forward as far as possible;
It is best to stretch your arms as far forward as possible so that the chest is slightly above the floor surface. If it is difficult to do this, then they fall by half. The number of repetitions is from five to ten times.
It is best to start doing the exercise with small ranges, increasing progress gradually. Each athlete chooses the optimal length of the rental for himself. You need to move until you are able to return back through the use of the abdominal muscles.

This is another option for beginners that allows you to perfectly maintain both a fixed length of the video and the training pace. Using the wall as a focal point. It is recommended to perform the rental rather slowly.
Execution:
- become about a meter from the surface of the wall;
- perform rolling from the knees so that the roller comes into contact with the wall;
- return to their original position.
Do five to ten repetitions.

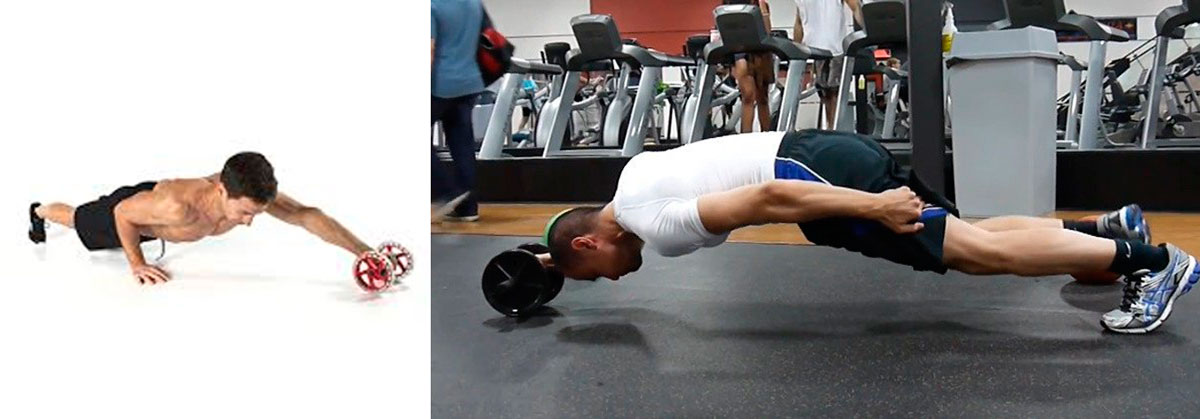
Performing a full roll with a roller is an exercise of increased difficulty, but with a wide stance it is much easier to do. When the exercise is mastered, the position is changed, narrowing the distance between the legs, until a full roll is completed.
Performance:
- legs are placed along the width of the shoulder girdle, bending at the waist, and then grasping the handle of the roller lying on the floor;
- the back and arms are kept straight and rolled forward until the torso becomes horizontal to the floor surface, resting their feet on the fingers in the same way as push-ups;
- the wheel is rolled back towards the legs and again bent at the waist to return to the starting position.
Do five to six repetitions.
When rolling from knees in a wide stance is mastered, they move on to full skating, but already with a narrow stance. The exercise allows you to effectively engage the muscles of the whole body and involves the muscles of the shoulders, back, abs, and arms.
The next option after the frontal exercise is the oblique roll. The main emphasis in the exercise is on the oblique muscle groups of the abdomen.
Execution:
- get on both knees and grab the handles;
- but, instead of a direct movement, they begin to roll forward, and then turn at an acute angle (45 degrees), completing the exercise in this direction;
- return to the starting position, and then slowly roll at the selected angle to the right.
Do about five or ten repetitions.
This rental is a complex version of the frontal. The weight is held by the hand on the roller. The main advantage of this exercise is the creation of additional tension on the stabilizing muscles. Initially, it is quite difficult, so you should not start with the full version. At first it is better to practice rolling from the knees.
Performance:
- kneel down or stand right in front of the roller, depending on whether they are practicing or working;
- bend along the waistline, and then grasp the handle with one hand;
- slowly move forward, focusing on the muscle groups of the body;
- return to their original position.
Do three to five repetitions. When making a rental, make sure that the body does not tip over to the side. To maintain balance, it is allowed to stick to the floor surface with your free hand.
On one leg
It is a complicated option that requires a lot of strength from the stabilizer muscles. You should proceed to this exercise after mastering the full roll on two legs.
Execution:
- stand directly in front of the projectile;
- bend at the waist and grab the handles of the wheel;
- the back is kept straight, and the arms are extended and rolled forward;
- return to the starting position, standing on one leg and again bend at the waist.
Do about five to ten repetitions.

This variation of rolling requires the use of a roller, which is equipped with special pedals for the feet, since the rolling is carried out not by the hands, but by the lower limbs. This exercise engages the arms, shoulder girdle, obliques, and abdominal muscles.
Performance:
- the feet are fixed in special pedal devices and stand in a plank position, holding arms straightened at the elbow joints under the shoulders;
- roll the wheel with the involvement of the legs so that both knees move to the chest, keeping the upper part motionless;
- straightening the knee joints until they return to the plank position again.

This variation uses the stabilizing muscles and oblique abs.
Execution:
- the feet are fixed in the pedals and stand in the bar, stretching the arms in front of the shoulder joints;
- the wheel is rolled with the feet and moved to the right elbow;
- return to the plank position and roll to the left.
Perform eight to twelve repetitions.

This variation resembles a crease, but the legs are kept straight:
- the feet are also fixed in the pedals and rise to the bar, stretching the arms under the shoulder joints;
- involve the muscle groups of the body and slowly roll the roller wheel to the top, bend at the hips, lifting the gluteal muscles up;
- roll the roller to its original position.
Do from eight to twelve repetitions.

The press roller may seem quite simple to use, but it requires serious effort from the athlete, and, most importantly, well-developed muscle groups of the body, since they are activated during the roll.
If the exercises are done incorrectly, then due to the excessive load exerted on the muscles of the back and hip flexors, the likelihood of injury increases. They are not recommended for those people who have problems with an intervertebral hernia or lower back.
In order to observe the correct execution technique and not get injured while working with the roller, you should follow a few rules:
- always check that the movement is carried out with the help of a wheel, and not due to the movement of the rug located on the floor;
- do not bend in the lower back and do not let the body or knees touch the floor surface;
- always keep your back, legs and arms straight;
- do rolling, regardless of the degree of difficulty, slowly, increasing progress gradually;
- reduce the range of motion performed if there is pain in the shoulder girdle;
- concentrate all attention on the muscles of the press.
Proper ab roller training involves maintaining a slow speed. When the back begins to sag, it means that the roll is either made from the knees or the length is shortened. The head should be in a neutral position and the chin should be slightly tucked in to help protect the neck and lower back.
It is recommended to perform exercises with a roller after a good warm-up, as they immediately give an intense load on the muscles of the whole body. At the end of the training, they do a hitch, that is, a good stretch. Beginners should use the wheel twice a week, and only then increase the number of training days with it to five times. This also applies to repetitions. You need to start with two or three, and then increase the pace.
There are quite a few simulators that are compact in size, but capable of making work on the body much more efficient. One of them is the ab roller, which is aimed at strengthening the abdominal muscles, but also allows you to work with other muscle groups. Exercises with a simulator can be performed not only by trained athletes, but also by beginners taking their first steps in the world of sports.
The simulator can be found in almost any sports store or purchased online. The names can be different: press roller, press wheel, sports wheel, gymnastic wheel, gymnastic roller. In fact, these are the names of the same simulator.
What is a trainer
The press wheel fully justifies its name. In fact, this is a wheel, on both sides of which handles are fixed. The simulator can have either one or two wheels or provide for the possibility of installing / removing an additional wheel. The diameter can be different, but usually ranges from 15-20 cm (the smaller the diameter, the more difficult it is to practice). The simplest models have ordinary plastic handles, while the more advanced ones have rubberized ones, which is much more convenient and safer when practicing. 
Upgraded models can be equipped with foot pedals, which allow you to expand the list of exercises and work more actively on the lower body. You can also purchase a wheel trainer with handles, which will have a built-in trimmer with tensioners (expanders).
What to look for when choosing
When purchasing a gymnastic roller, it is important to correctly assess your capabilities and needs, as well as analyze the product offerings on the market. This is necessary in order to buy a simulator specifically for your level, and also not to succumb to the tricks of consultants in stores, for whom it is sometimes much more important not to help the client find the right option, but to sell him a more expensive model.
The simulator with a return mechanism is the best option for beginners. It allows you to facilitate training and minimize the risk of injury. But unlike a simple wheel that does not have such a function, it does not give such a high load.
Working with a press wheel with two rollers is much easier than with one. Such a simulator keeps balance better, although it facilitates the load.
A roller with a shifted center of gravity is more suitable for those who already have experience with a simple wheel and are ready for more complex loads. For beginners, this model is not recommended.
When choosing, pay attention to the weight of the wheel. Light weight models are easier to deal with, heavier ones are more difficult.
A wheel with pedals is usually chosen by those who are engaged professionally. Such a simulator allows you to significantly diversify the set of exercises with it and get the best result. Even more options for performing exercises are provided by a simulator, additionally equipped with a trimmer with tensioners. It allows you to increase the load through the use of cable tension.
What muscles are strengthened when working with a simulator
Exercises with a press roller are aimed at working out mainly the upper part of the body, namely the arms, shoulders, abdomen, back and chest. But when they are performed, a significant load also falls on the muscles of the lower press and lower back, the buttocks, quadriceps and biceps of the thigh are additionally involved.
Performing exercises with the wheel in the “plank” position, almost no part of the body remains unloaded. A wide range of options for using the simulator also allows you to work on hidden muscles, while achieving the best result.
How to pump the press and other muscles with a wheel
There are quite a few exercises in which the gymnastic wheel is used. The principle of operation is always almost the same, but the starting position changes.
On my knees
Holding with straightened arms on the handles of the roller, rest it on the floor and place it strictly under the shoulders. Slowly begin to roll the wheel forward to the distance of outstretched arms, just as slowly return to the starting position. This is the simplest option, but quite effective for working out the press. To work on the oblique muscles of the press, a similar exercise is performed, but the roller does not roll forward, but slightly away from the body.
Down on one knee
In this case, the second leg is laid aside. The exercise is performed similarly to the previous one. It is also possible to roll the roller both forward and to the side.
Emphasis half standing
Kneel with one foot, the other rests against a wall or other reliable surface. Holding the roller in your hands, roll it back and forth as much as possible, keeping the center of gravity on it.
Emphasis standing
Feet shoulder-width apart, arms straightened, roller rest on the floor. Roll it forward as much as physical fitness allows, then go back.
sitting on my knees
Roll forward to a prone position, without lifting your knees from the floor, pull yourself back.
It is recommended to perform each exercise with a press roller 10 times, doing 3 sets. At the initial stage of training, the number of repetitions and approaches can be reduced. This is especially true for those who are not physically active. It is best to do it every other day, because the muscles need time to recover.
It is extremely important every time before you start using the gymnastic roller, warm up the body with simple exercises. It can be running, squatting, tilting, etc.
The advantages of the roller over other simulators
Despite its simplicity, small dimensions and low cost, a sports roller has many advantages and can seriously compete with more complex and expensive simulators. Its advantages include:
- High efficiency in the direction of strengthening the muscles of the press, as well as the general "drying" of the body and reducing the amount of body fat;
- Acting on both the rectus and oblique muscles of the abdomen, the roller helps to change its shape, making the press taut and attractive;
- Increase endurance, improve posture;
- Does not take up much space, easy to assemble and operate;
- You can choose a simulator for a different degree of preparedness and weight of the athlete, as well as the type of exercise.
Features of the exercise
When performing exercises with a gymnastic wheel, you must adhere to certain recommendations that will help you get the most noticeable result from classes:
- For those who are just starting classes with a roller, it is better not to immediately get into the plank position, but to perform exercises with an emphasis on the knees;
- The wheel should be driven as smoothly as possible, without jerking;
- During the movement of the wheel, the abdominal muscles must be in constant tension;
- In the final position, you need to make a short pause.
- Performing the exercise while kneeling, it is necessary to put a special gymnastic rug under them to minimize the load on the joints.
There are a number of contraindications for wheel training. Traditionally, they include:
- Spinal injuries and joint diseases;
- The presence of chronic diseases;
- Bad feeling;
- Pregnancy.
In case of pain in the back and spine, it is recommended to stop exercising and consult with specialists.
The main purpose of the roller press is the facing of MDF, chipboard, fiberboard and other board materials. Such equipment is also suitable for processing pre-profiled sheets with plastics and films.
Most often, roller presses are used in medium and large-scale production. The unique installation is indispensable in the manufacture of countertops, kitchen furniture and office interior items. Roller presses are commonly used in conjunction with softforming and postforming machines.
Features of roller presses
In roller presses, workpieces are fed using upper and lower rubberized rollers. Modern equipment allows you to adjust the feed rate using the control panel (on the front plane of the bed). Thanks to the ability to regulate the operation of the system, it is possible to eliminate the possibility of damage and slippage of workpieces.
To adjust the roller press in thickness, a screw pair is provided (the handle is located at the end of the machine). You can control the accuracy of the measurement using the indicator scale. Please note that the upper pressure roller must be in the upper position when setting.
During pressing, the force is provided by pneumatic cylinders, thanks to which it is possible to perform the facing more efficiently. Upper heating elements are used to heat the facing material. Such a system allows the secondary activation of the binder, due to which the connection is more durable. The heater temperature can be changed at any time using the control panel. When creating roller presses, special attention is paid to ensuring the safety of working on such equipment. A reliable protective screen is installed in the front of the machine. In addition, emergency shutdown buttons are provided at the exit.
Roller presses for furniture and woodworking industries
The NEVASTANKOMASH company offers a wide range of roller presses that can meet the needs of any scale of production. We have a variety of machine models that differ in power, feed rate, maximum width and thickness of the workpieces.
Contact NEVASTANKOMASH consultants to buy equipment that is guaranteed to make your business more efficient.